The Ultimate Guide to Garage Door Bottom Seals: A Buyer’s First Step


Published: Jun 24, 2026 | Updated: Jul 28, 2026

Ever walked into your garage on a chilly morning and felt a draft that had no business being there? Or maybe you’ve noticed a small puddle of water creeping in after a rainstorm, or worse, evidence of an unwelcome furry visitor. That thin strip of rubber or vinyl at the bottom of your garage door is the unsung hero responsible for keeping your space clean, dry, and energy-efficient.

But when it’s time to replace it, you’re suddenly faced with a confusing world of T-styles, J-types, bulbs, beads, and different materials. It’s easy to get lost.

This guide is your friendly map. We’ll walk you through everything, starting with the single most important secret to getting it right the first time.

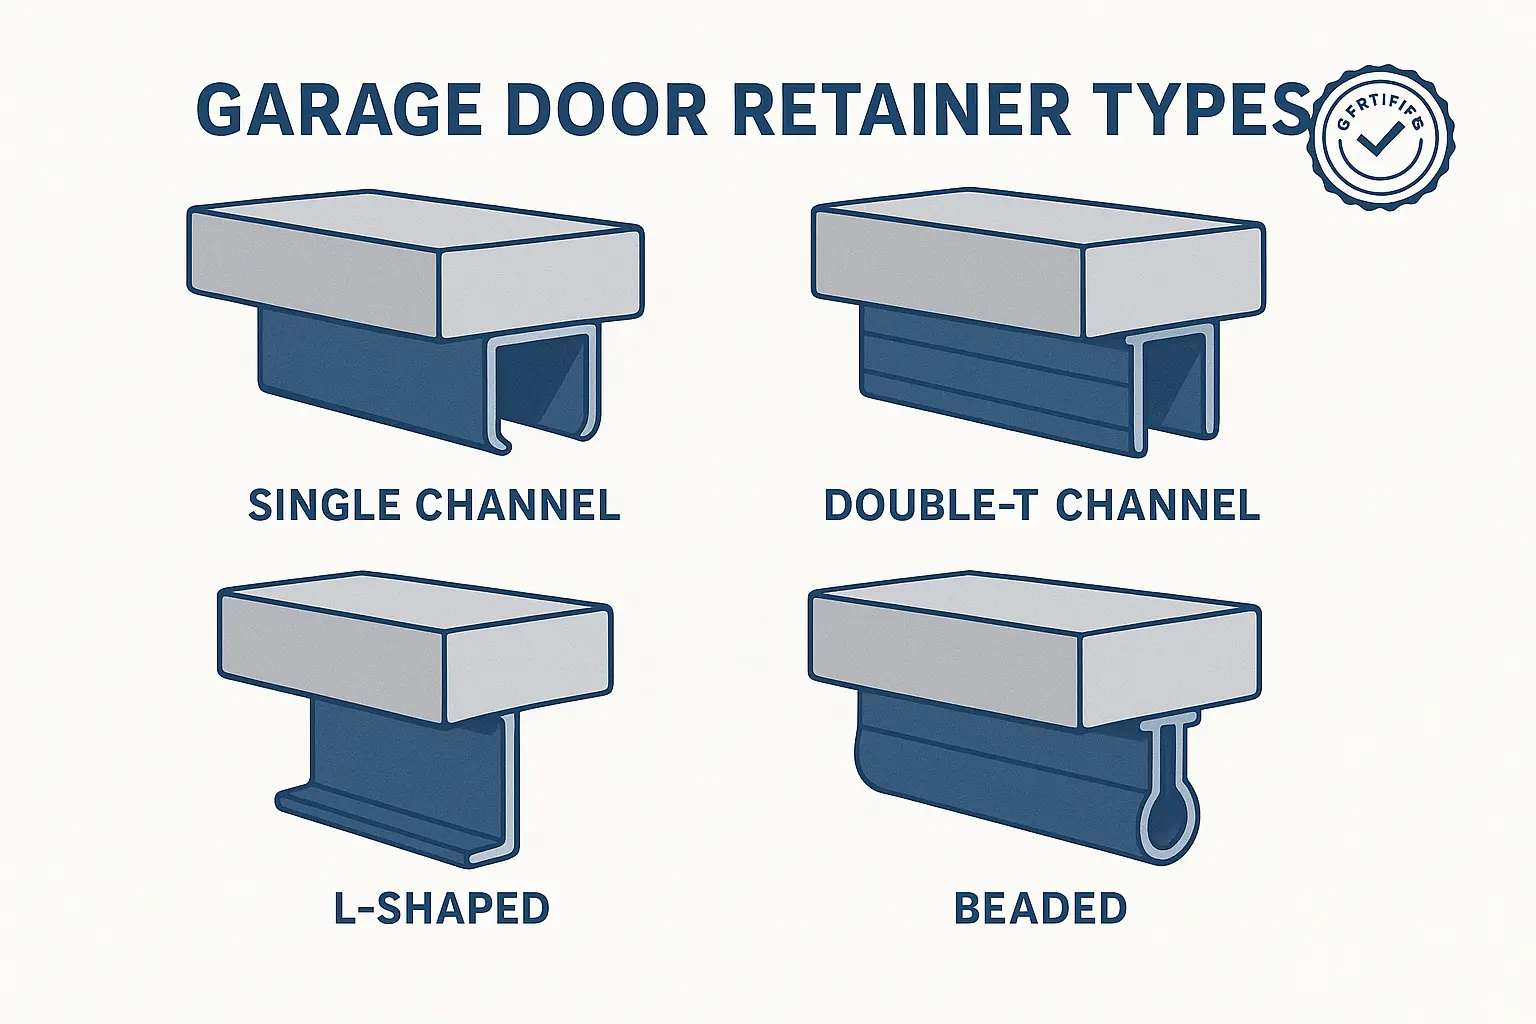
Foundation Part 1: The #1 Mistake to Avoid - Match Your Seal to Your Retainer


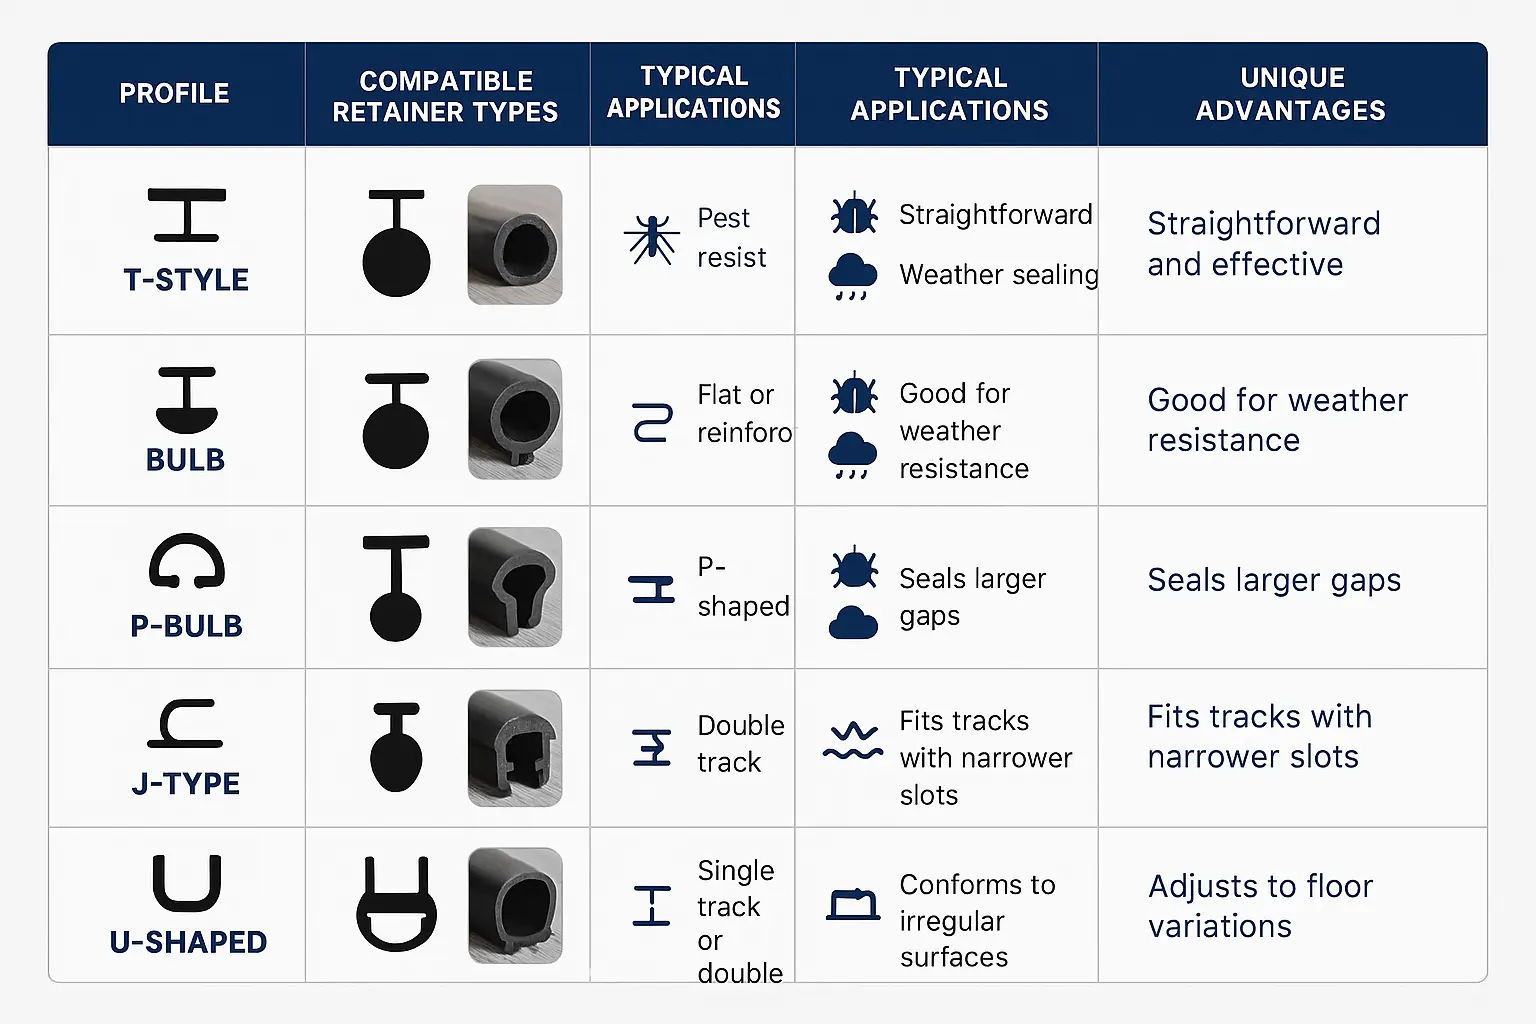
Visualizing the critical door retainer types to avoid costly mistakes — your bottom seal choice depends on this foundation.
Before you even think about the material or the width of the seal, stop. Look at the very bottom of your garage door. That metal track holding the old seal in place is called the retainer, and its shape dictates everything.

Buying a seal without knowing your retainer type is like buying a phone case without knowing your phone model—it simply won’t fit. This is the most common and frustrating mistake people make. To avoid it, your first job is to play detective and identify your retainer.

Common Retainer Types:

Action Step: Take a clear photo of the end of your current seal and the channel it slides into. This picture will be your most valuable tool when shopping.

Foundation Part 2: The Vocabulary of Seals - A Visual Dictionary


Comprehensive comparison of popular garage door bottom seal profiles to match your door’s retainer and environment needs with ease.
Now that you’ve identified your retainer, you can confidently explore the different seal profiles that will actually fit. Think of these as the “keys” that fit the retainer “lock.”

Common Seal Profiles:

Building: Choosing the Right Material for Your Climate


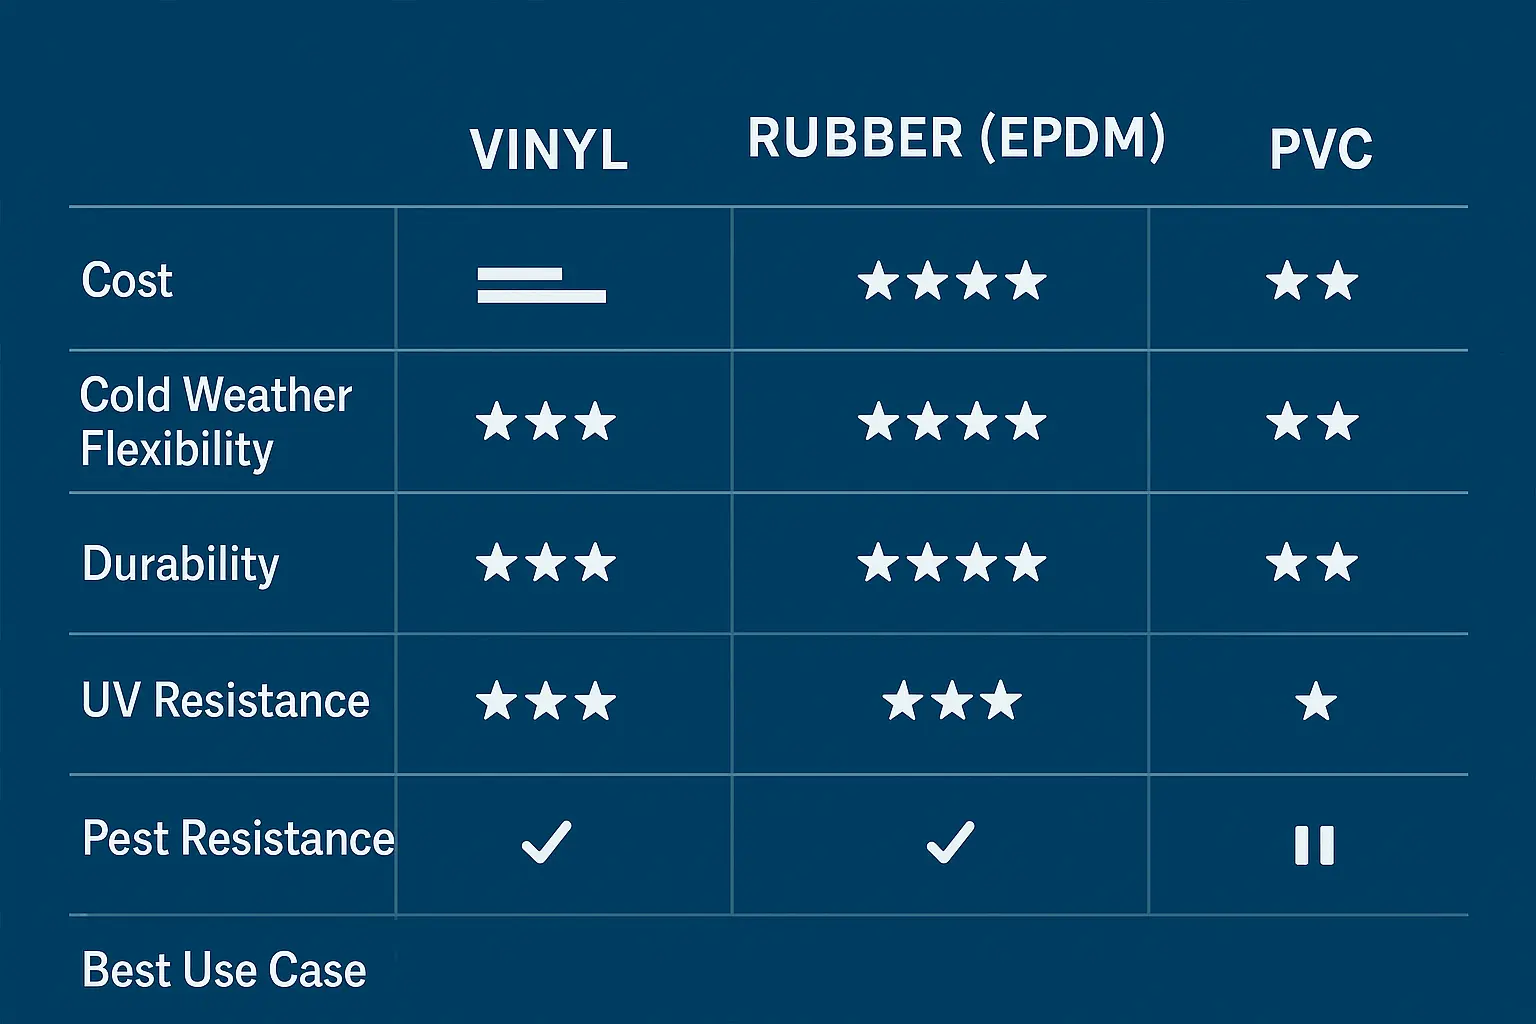
Material choices matter: Compare vinyl, rubber, and PVC seals to find the best fit for your climate and longevity needs.
You’ve matched the profile to your retainer. The next step is choosing a material that can stand up to your local weather. The wrong material might crack in the cold or degrade under intense sun, forcing you to replace it much sooner.

Material Comparison:

Material Cold Weather Flexibility Durability & UV Resistance Best Use Case
Vinyl Good Moderate A budget-friendly choice for moderate climates without extreme temperature swings. Can become stiff in freezing weather.
Rubber (EPDM) Excellent Excellent The superior choice for climates with freezing winters. EPDM rubber stays flexible and won’t crack in the cold, ensuring a solid seal year-round.
PVC Fair Good A durable plastic polymer that holds its shape well but can be less flexible than rubber in extreme cold.

Mastery: Solving Specific Problems


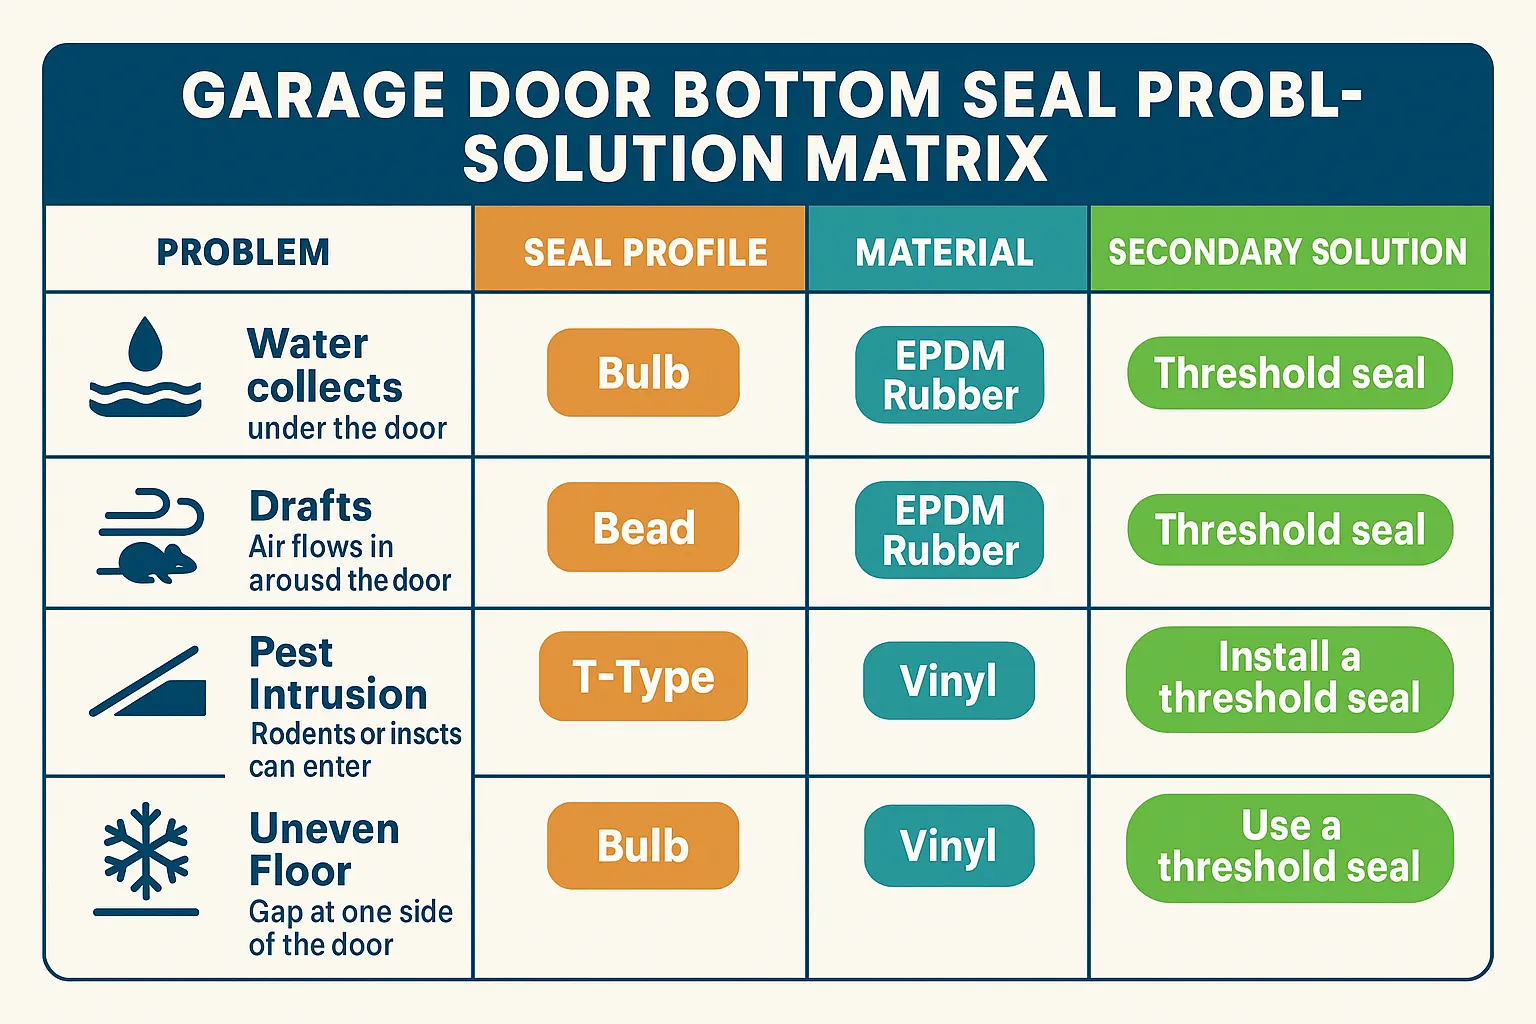
Match your garage door problems to the right bottom seal solutions — confident sealing starts here.
A new bottom seal can do more than just block drafts. By choosing the right combination of profile and material, you can solve some of the most common garage headaches. If you’re struggling with high utility bills, understanding how can a garage door bottom seal help with energy efficiency? is the first step toward a more comfortable and cost-effective home.
Problem: An Uneven or Cracked Floor

The Likely Cause: A standard flat seal can’t conform to the floor’s imperfections, leaving gaps.

Recommended Seal Solution: A Bulb-style seal is ideal. Its round shape compresses to fill gaps effectively. For severe slopes, consider adding a garage door threshold seal on the floor itself.

Problem: Water Seeping Under the Door

The Likely Cause: The seal is worn, cracked, or too small, allowing water to penetrate.

Recommended Seal Solution: A wider seal (e.g., 4″ or 6″) combined with a U-shaped profile can create a better barrier. EPDM rubber provides a more reliable, watertight seal.

Problem: Pests and Rodents Getting In

The Likely Cause: Small gaps created by a worn or ill-fitting seal provide an easy entry point.

Recommended Seal Solution: A thick rubber seal is harder for pests to chew through. Some brands offer rodent-proof seals infused with repellent materials. Ensure there are no gaps on the sides.

Problem: Daylight Visible on the Sides

The Likely Cause:The seal is not wide enough for the door, or the door isn’t closing completely.

Recommended Seal Solution: Measure your door’s thickness and choose a seal that’s at least an inch wider on both sides. If the door isn’t closing right, you may have garage door limit switch problems.

Your Pre-Purchase Checklist


Feeling more confident? Before you click “buy,” run through this final checklist to ensure you get the perfect seal.

Frequently Asked Questions


How do I know if I need a new garage door seal?

The signs are usually clear: you can see daylight under the door, feel a draft, or notice water, leaves, or pests getting inside. Visually inspect the seal for cracks, brittleness, or flat, compressed sections.

How often should a garage door bottom seal be replaced?

This depends on your climate and the material. A high-quality EPDM rubber seal in a harsh climate might last 5-10 years, while a basic vinyl seal in a mild climate could last just as long or degrade faster under intense sun. The significant energy loss due to poor door seals makes proactive replacement a smart investment.

Can I replace just the seal, or do I need a new retainer too?

In most cases, you only need to replace the seal insert. However, if your aluminum retainer is bent, cracked, or severely corroded, it won’t hold the new seal properly and should be replaced as well.

Is installing a new bottom seal a DIY job?

For most homeowners, yes. It typically involves removing the old seal and sliding the new one into the retainer. It’s helpful to have a second person to help feed the seal through the channel. Lubricating the channel with silicone spray or soapy water can make the process much easier. A complete garage door safety checklist is always a good idea before starting any DIY garage door project.

Your First Step to a Better Garage


Choosing the right garage door bottom seal doesn’t have to be complicated. By focusing on your retainer first, you can cut through the confusion and find the perfect fit. A well-sealed garage is more than just a convenience—it protects your home, saves you money on energy bills, and gives you peace of mind.

Now that you understand the what and why, you’re equipped to make a smart, confident decision that will keep your garage secure and comfortable for years to come.

Frequently Asked Questions


What are the different profiles of garage door bottom seals?

The most common garage door bottom seal profiles include U-shaped (astragal), J-shaped, T-shaped, and bulb seals. The right profile depends on your garage door track type and how much of a gap you need to cover.

What materials are used for garage door bottom seals?

Garage door bottom seals are typically made from rubber, vinyl (PVC), or silicone. Rubber is highly durable and handles extreme temperatures well, vinyl is an affordable and rigid option, and silicone provides excellent flexibility in extreme cold.

How do I choose the right bottom seal for my climate?

For extreme cold, silicone or heavy-duty EPDM rubber is best because they won't crack or stiffen. For moderate climates with heavy rain, a thick vinyl or U-shaped rubber seal effectively blocks water out.

How often should I replace my garage door bottom seal?

You should replace your garage door bottom seal every 2 to 3 years, or sooner if you notice visible cracking, drafts, water seeping in, or light shining through the bottom of the closed door.

Contact / Request a Call