You hear it before you see it: a sharp snap from the garage, followed by the grinding whir of the motor going nowhere. Your garage door is stuck. A quick look reveals the problem—the opener chain is dangling, broken.
That moment of panic is common. Your first thought might be, “Is this a huge, expensive repair?” The good news is, if the break happened at a specific component called the master link, you’re likely looking at a safe, 15-minute fix you can do yourself, not a costly service call.
This guide will walk you through every step, from identifying the problem correctly to testing your finished work. Let’s turn that moment of panic into a feeling of accomplishment.
Replacing a Broken Master Link on Your Garage Door Opener Chain
Published: Jun 4, 2026 | Updated: Jul 28, 2026
The "Aha!" Moment: Is It Your Chain or a High-Tension Cable?
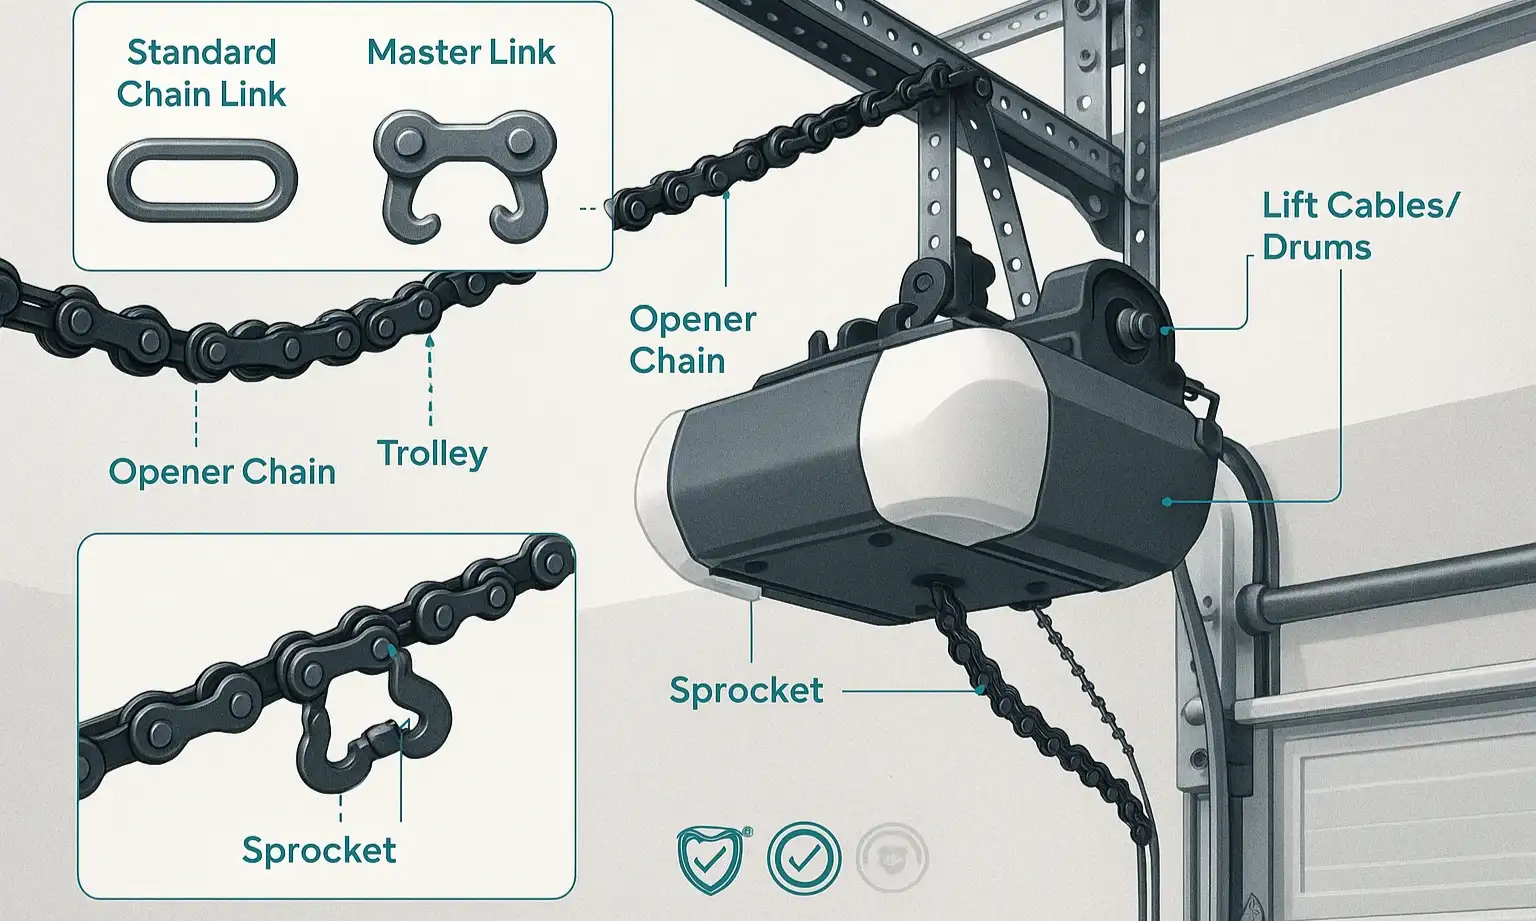
Before you touch anything, it’s critical to understand what’s broken. Homeowners often confuse the opener chain with the lift cables. Getting this wrong is the difference between a simple DIY task and a dangerous situation.
Here’s a quick visual guide to help you identify the parts of your system correctly.
The master link is the one link on the chain that looks different. It’s a special, removable link made of three pieces: two plates with pins and a retaining clip. This is the designed “weak point” that allows the chain to be installed or removed.
The master link is the one link on the chain that looks different. It’s a special, removable link made of three pieces: two plates with pins and a retaining clip. This is the designed “weak point” that allows the chain to be installed or removed.
Finding the Right Part: Are All Master Links the Same?
No, they aren’t. Master links are specific to the chain’s size (or “pitch”). Using the wrong size will cause the chain to skip on the sprocket or fail prematurely. Always check your garage door opener’s manual or look up the model number online to find the correct master link kit.
To save you some time, here’s a quick compatibility reference for major brands:
Brand-Specific Master Link Compatibility Guide
Building: Your 5-Step Replacement Guide
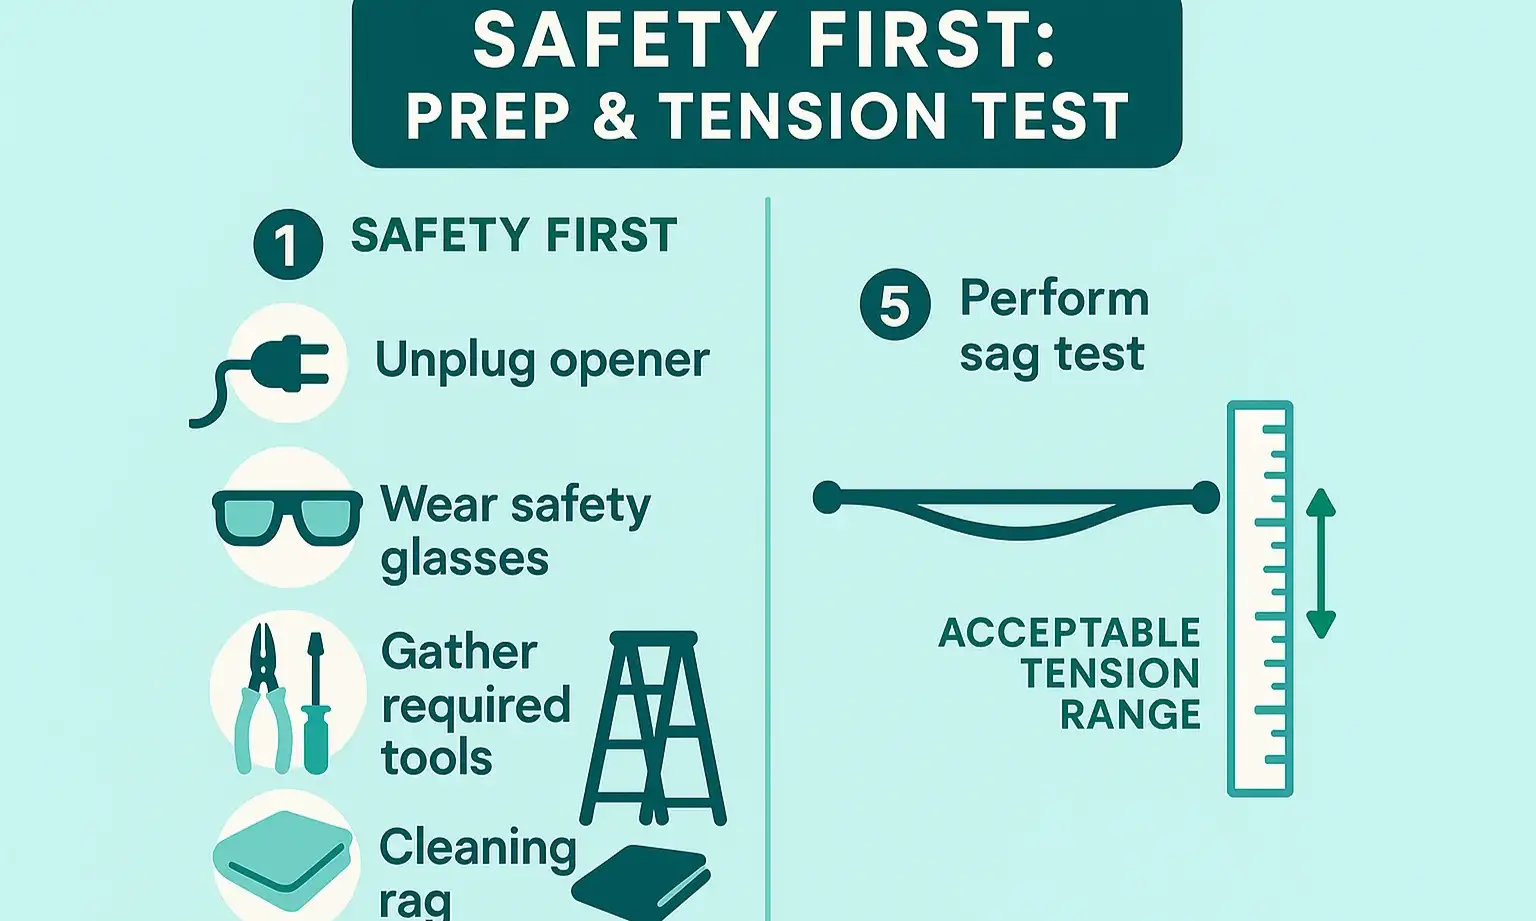
Once you’ve confirmed you have a broken master link and have purchased the correct replacement kit, you’re ready to begin. The whole process should take less than 20 minutes.
Step 1: Safety First & Prep
Before starting, your priority is to make the system safe to work on. This is non-negotiable.
Step 2: Release Chain Tension
You can’t work on the chain while it’s tight. Look at the trolley (the cart the chain pulls). You’ll see a threaded rod with two nuts on it connecting the chain to the trolley.
1. Use your pliers or a wrench to loosen the inner nut (the one closer to the door).
2. Turn it a few times counter-clockwise. You will see the chain visibly sag as the tension is released. This gives you the slack you need to work.
Step 3: Remove the Old Master Link
Now, locate both ends of the broken chain. The master link will likely still be attached to one of them.
1. Use the small flathead screwdriver to pry off the retaining clip. It’s a small, E-shaped clip. Pry it away from the pins.
2. Once the clip is off, you can slide off the outer plate.
3. The main part of the link with the two pins can now be pulled out of the chain ends. Discard all three old pieces.
Step 4: Install the New Master Link
Your new master link kit will have the same three pieces: the pin plate, the outer plate, and the retaining clip.
1. Take the pin plate and insert the two pins through the ends of your broken chain, connecting them.
2. Place the outer plate over the two pins on the other side.
3. Here’s the key part: Slide the retaining clip into the grooves on the ends of the pins. You should hear or feel a faint “click” as it seats properly. The closed end of the clip should face the direction of chain travel.
Step 5: Re-tension and Test the Chain
With the new link in place, it’s time to tighten everything back up.
1. Go back to the trolley and turn the outer nut clockwise to tighten the chain.
2. How tight should it be? The goal is to remove the slack, but not make it guitar-string tight. A properly tensioned chain should have about 1/4 to 1/2 inch of sag in the middle. You should be able to lift it slightly off the rail with your fingers. A chain that’s too tight puts stress on the motor and sprockets.
3. Once the tension is correct, tighten the inner nut against the outer nut to lock it in place.
4. Plug the opener back in and run a full open-and-close cycle. Watch the new master link travel around the sprocket to ensure it moves smoothly. If everything works well, you’re done!
Mastery: Troubleshooting & Pro Tips
You’ve completed the repair, but what if something isn’t quite right? Or what caused the problem in the first place?
Get Your Day Back on Track
Congratulations! You’ve just tackled one of the most common garage door opener repairs, saving yourself time and money. By correctly identifying the problem, following safety procedures, and carefully replacing the broken part, you’ve restored your garage door to working order.
This small repair is a huge confidence booster and a great first step into understanding how your garage works. Now that you know the basics of the drive system, you’re better equipped to handle routine maintenance that will keep it running smoothly for years to come.
This small repair is a huge confidence booster and a great first step into understanding how your garage works. Now that you know the basics of the drive system, you’re better equipped to handle routine maintenance that will keep it running smoothly for years to come.
Frequently Asked Questions
How can I tell whether my broken part is the opener chain or a lift cable?
The opener chain is the bike-like chain that runs along a rail above your door, and it's a low-tension part that's safe to work on; if it breaks, the motor just runs without moving the door. Lift cables are the thick steel cables on the sides of the door that connect to high-tension springs, and if one of those has snapped you should not attempt a repair yourself, because they are under extreme tension and can cause serious injury.
What exactly is the master link on a garage door opener chain?
The master link is the one link on the chain that looks different from the others. It's a special, removable link made of three pieces—two plates with pins and a retaining clip—and it acts as the designed weak point that allows the chain to be installed or removed.
Do I need a specific master link, or are they all the same?
They aren't all the same. Master links are specific to the chain's size, or pitch, and using the wrong size can cause the chain to skip on the sprocket or fail prematurely. Always check your opener's manual or look up the model number to find the correct master link kit—for example, Chamberlain and LiftMaster systems typically use a #48 chain, the most common size for residential models.
Is replacing a broken master link really a job I can do myself?
Yes—if the break happened at the master link, you're likely looking at a safe fix of about 15 minutes rather than a costly service call. Because the opener chain is a low-tension part, it's safe to work on, unlike the high-tension lift cables that require a professional.