The power flickers back on, your clocks are blinking “12:00,” and you breathe a sigh of relief. But then you hit the button for your garage door, and it starts behaving strangely. It closes part-way and then reverses, or it stops short of the floor, leaving an annoying gap.
If this sounds familiar, you’re not alone. It’s one of the most common issues homeowners face after a power outage.
Here’s the simple explanation: Your garage door opener is essentially a small computer with a memory. It remembers exactly where to stop when opening (the “up limit”) and where to stop when closing (the “down limit”). When the power cuts out, this memory gets scrambled. It’s like your alarm clock—it knows it has a job to do, but it has forgotten the specific settings.
The good news? Fixing it is usually a simple calibration that you can do in about five minutes. This guide will walk you through every step, transforming you from a frustrated homeowner into a confident DIYer.
Step-by-Step Guide to Resetting Garage Door Opener Travel
Published: May 20, 2026 | Updated: Jul 28, 2026
First Things First: Reconnect Your Opener to the Door
Before you can adjust any settings, you need to make sure the opener is actually in control of the door. If you had to pull the red emergency release cord during the outage, the door is currently in manual mode.
If you need a more detailed walkthrough, our guide on how to reset your garage door after pulling the red cord can help you get reconnected with confidence.
The Two-Step Fix: Resetting Travel and Force Settings
The “memory” your opener lost consists of two key settings:
Resetting these two settings will solve the problem over 90% of the time.
Step 1: Identify Your Opener’s Adjustment Type
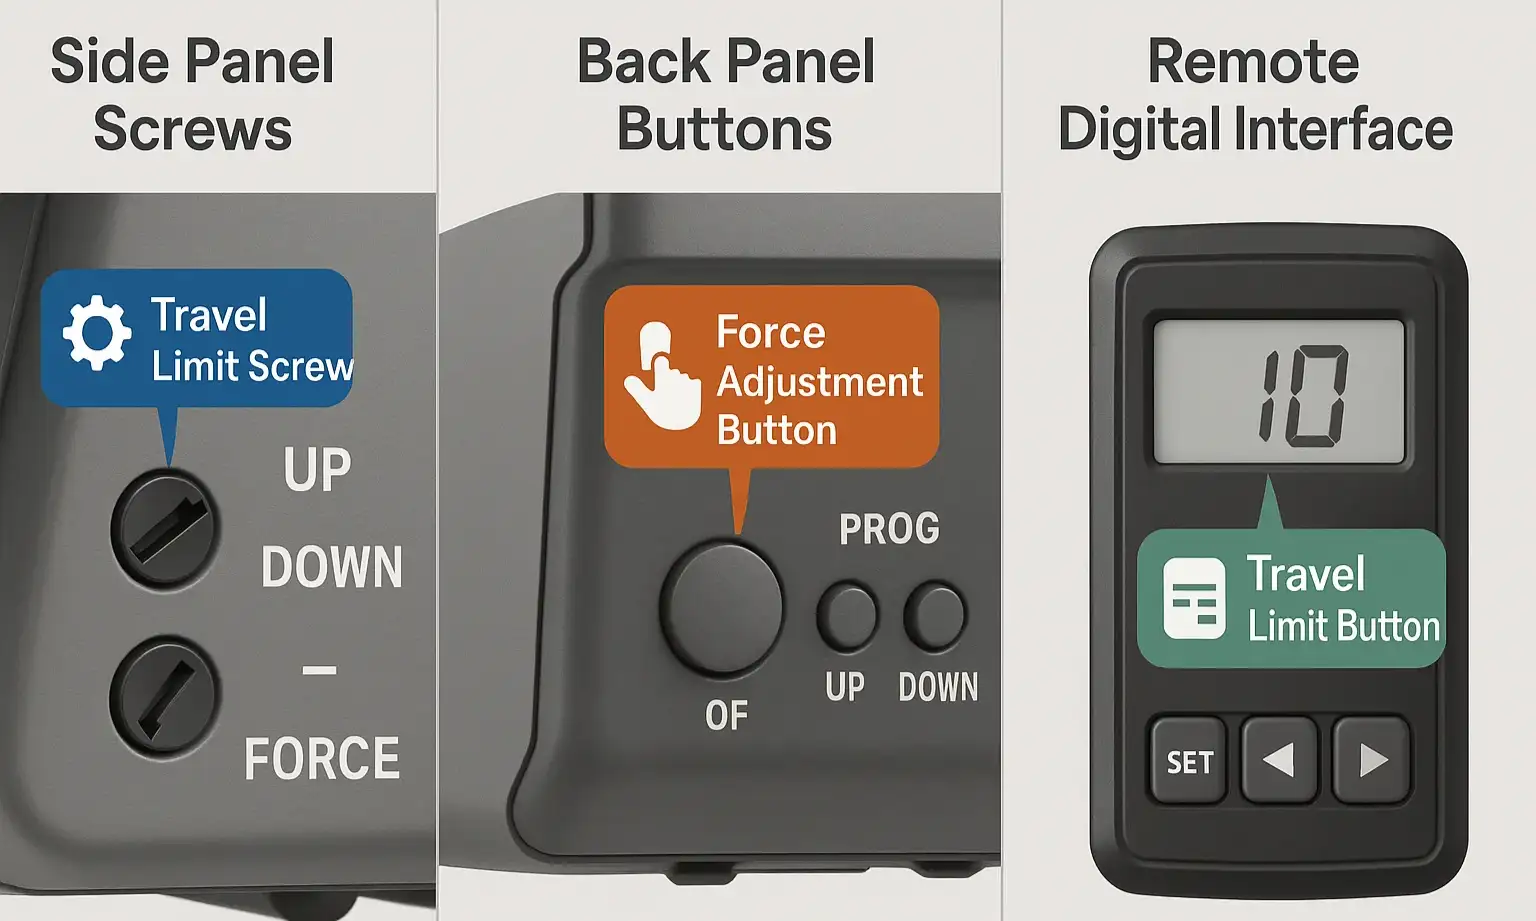
Pop open that ladder and take a look at your garage door opener motor. You’ll typically find one of two types of adjustment controls. Finding the right one is the key to a quick fix.
Identify your garage door opener adjustment type at a glance to follow the correct resetting instructions without confusion or guesswork.
Once you’ve identified your type, follow the corresponding instructions below.
Step 2: Program Your Garage Door Travel Limits
This is where you’ll “re-teach” the opener where to stop. The goal of any garage door opener adjustment is to get the door to close securely without slamming and to open fully without straining the system.
Follow these expert-verified steps to accurately reset your garage door opener travel limits and restore smooth operation after a power outage.
For Openers with Adjustment Screws:
1. Get a Flathead Screwdriver: You’ll need it to make small adjustments.
2. Adjust the UP Limit: Press your remote to open the door. If it doesn’t open fully, turn the “UP” limit screw counter-clockwise a full turn or two. Each full turn typically equals two inches of travel. Run the door up and down, adjusting until it opens to your desired height.
3. Adjust the DOWN Limit: Now, close the door. If it reverses before hitting the floor or leaves a gap, turn the “DOWN” limit screw clockwise. This will increase the downward travel. If it hits the floor and reverses, you’ve gone too far; turn the “DOWN” screw counter-clockwise.
4. Test and Refine: Run the door a few times to ensure it stops perfectly at the top and creates a snug seal at the bottom without slamming. The components that read these positions are part of the garage door limit switch system.
For Openers with Electronic Buttons:
The process can vary slightly by brand, but this sequence is most common.
1. Enter Programming Mode: Press and hold the square “Learn” or “Program” button for a few seconds until an LED light comes on or starts blinking.
2. Set the UP Limit: Press and hold the “Up” arrow button. The door will begin to move upwards. Release the button when the door reaches the desired fully open position. Press the square program button once to save the position.
3. Set the DOWN Limit: Press and hold the “Down” arrow button. The door will travel downwards. Release it when it is fully closed.
4. Save and Exit: Press the square program button one more time. The LED light should turn off, indicating that the new travel limits are saved. Run the door a full cycle with your remote to confirm it works correctly.
Fine-Tuning: How to Adjust and Test Your Force Settings
With the travel limits set, the final check is the force setting. This is a critical safety feature that ensures the door reverses if it hits an object (or a person).
The most reliable way to test this is with a 2×4 piece of wood laid flat on the ground where the door closes.
The most reliable way to test this is with a 2×4 piece of wood laid flat on the ground where the door closes.
If the door does not reverse, the downward force is set too high. If it reverses on its own without touching the wood, the force may be too low. Look for a “Force Adjustment” dial or buttons on your opener motor, separate from the travel limits. Make very small adjustments and re-test with the 2×4 until it reverses properly. For a deeper dive, learn more about force settings and why they’re so important for safety.
What if it's Still Not Working? Troubleshooting Common Issues
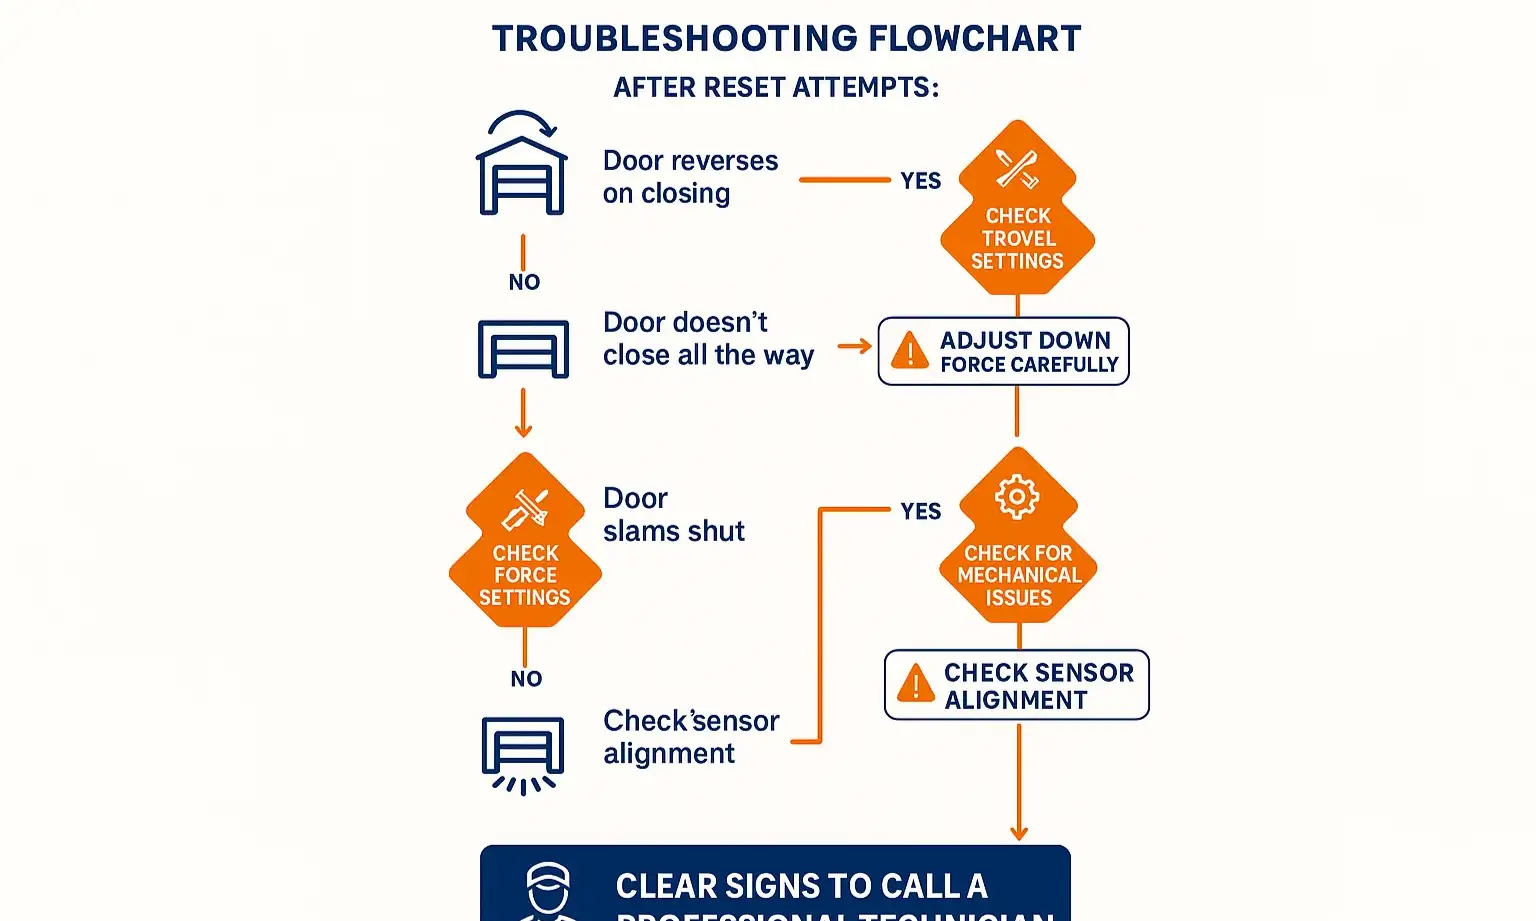
Did you follow the steps, but something is still off? Don’t worry. Here are a few common hiccups and what to check next.
Navigate common garage door reset issues confidently with this easy-to-follow troubleshooting flowchart that helps you know when adjustments suffice and when expert help is needed.
Navigate common garage door reset issues confidently with this easy-to-follow troubleshooting flowchart that helps you know when adjustments suffice and when expert help is needed.
Symptom: The door closes all the way, then immediately opens back up.
Likely Cause: Your “DOWN” travel limit is set too far, causing the opener to think it’s hitting an obstacle. Try reducing the down travel slightly (turn the screw counter-clockwise or re-program the button).
Symptom: The main lights on the opener motor are blinking continuously.
Likely Cause: This is often a signal that your safety sensors (the two small “eyes” near the bottom of the door tracks) are misaligned or blocked. Check for spiderwebs, leaves, or clutter. Make sure the small LED lights on both sensors are solid (not flickering).
Symptom: The door moves in short, jerky motions.
Likely Cause: This could be a sign that the door is binding in the tracks or a more serious mechanical issue. Don’t force it. This is a good time to stop and consider professional help.
Likely Cause: Your “DOWN” travel limit is set too far, causing the opener to think it’s hitting an obstacle. Try reducing the down travel slightly (turn the screw counter-clockwise or re-program the button).
Symptom: The main lights on the opener motor are blinking continuously.
Likely Cause: This is often a signal that your safety sensors (the two small “eyes” near the bottom of the door tracks) are misaligned or blocked. Check for spiderwebs, leaves, or clutter. Make sure the small LED lights on both sensors are solid (not flickering).
Symptom: The door moves in short, jerky motions.
Likely Cause: This could be a sign that the door is binding in the tracks or a more serious mechanical issue. Don’t force it. This is a good time to stop and consider professional help.
When a Reset Isn't Enough: Knowing When to Call a Professional
This DIY reset solves most post-outage problems, but it can’t fix mechanical failures. You should stop immediately and call for service if you notice:
These issues require specialized tools and knowledge to fix safely. If you’re in Connecticut and facing a problem that seems bigger than a simple reset, our team is available for emergency garage door repair 24/7 to get your door operating safely again. Performing regular checks using a garage door safety checklist can also help you spot these problems early.
Frequently Asked Questions (FAQ)
Why does a power outage mess up my garage door in the first place?
Think of your opener’s control board like a computer’s short-term memory (RAM). It holds the travel and force settings for quick access. A sudden power loss can wipe this memory clean, forcing the system to revert to its factory defaults, which don’t match your specific door.
Do I need any special tools for this?
For most models, all you’ll need is a sturdy ladder and a flathead screwdriver. If you have an electronic button model, you may not even need the screwdriver.
How long should this take?
Once you’re set up with your ladder, the actual adjustment process typically takes less than 10 minutes. The first time might take a little longer as you familiarize yourself with the controls.
Is it safe to adjust these settings myself?
Absolutely. Adjusting the travel and force settings is a safe and standard maintenance task for homeowners. The key is to always perform the 2×4 safety reversal test afterward. Never attempt to adjust, repair, or remove the garage door springs or cables, as they are under extreme tension and can cause serious injury.
Frequently Asked Questions
Why does a power outage mess up my garage door in the first place?
Think of your opener's control board like a computer's short-term memory (RAM). It holds the travel and force settings for quick access. A sudden power loss can wipe this memory clean, forcing the system to revert to its factory defaults, which don't match your specific door.
Do I need any special tools for this?
For most models, all you'll need is a sturdy ladder and a flathead screwdriver. If you have an electronic button model, you may not even need the screwdriver.
How long should this take?
Once you're set up with your ladder, the actual adjustment process typically takes less than 10 minutes. The first time might take a little longer as you familiarize yourself with the controls.
Is it safe to adjust these settings myself?
Absolutely. Adjusting the travel and force settings is a safe and standard maintenance task for homeowners. The key is to always perform the 2×4 safety reversal test afterward. Never attempt to adjust, repair, or remove the garage door springs or cables, as they are under extreme tension and can cause serious injury.