You’ve done it. You went to the hardware store and bought the biggest, brightest LED fixture you could find. You mounted it right in the middle of your garage ceiling, flipped the switch, and basked in its 10,000-lumen glory. But the moment you lean over your workbench to measure a piece of wood or inspect an engine part, you’re plunged into darkness—the shadow of your own head obscuring the very detail you need to see.
If this sounds familiar, you’ve stumbled upon the most common myth in workshop lighting: that more brightness equals better light.
The truth is, creating a truly functional, shadow-free workspace isn’t about raw power. It’s about a strategic approach that considers the quality, quantity, and—most importantly—the placement of your light sources. This guide will walk you through the three pillars of effective workshop lighting, transforming your frustratingly dim space into a haven of clarity and precision.
Optimizing LED Lighting for Garage Workshops and Detailed Tasks
Published: Jun 25, 2026 | Updated: Jul 28, 2026
The 3 Pillars of Workshop Light: Beyond Brightness
To move from a simply “bright” garage to a “well-lit” one, you need to understand three core concepts. Grasping these fundamentals is the first step in any successful lighting plan and is a key part of many garage makeover ideas that focus on functionality.
1. Brightness (Lumens, Not Watts)
For decades, we were taught to measure light by watts. But with the efficiency of modern LEDs, watts only tell you how much energy a bulb uses, not how much light it produces. The metric that truly matters is lumens.
Lumens measure the total amount of visible light emitted by a source. Think of it like a showerhead: lumens represent the total volume of water coming out. But what you really care about is the amount of light hitting your workbench, which is measured in foot-candles or lux.
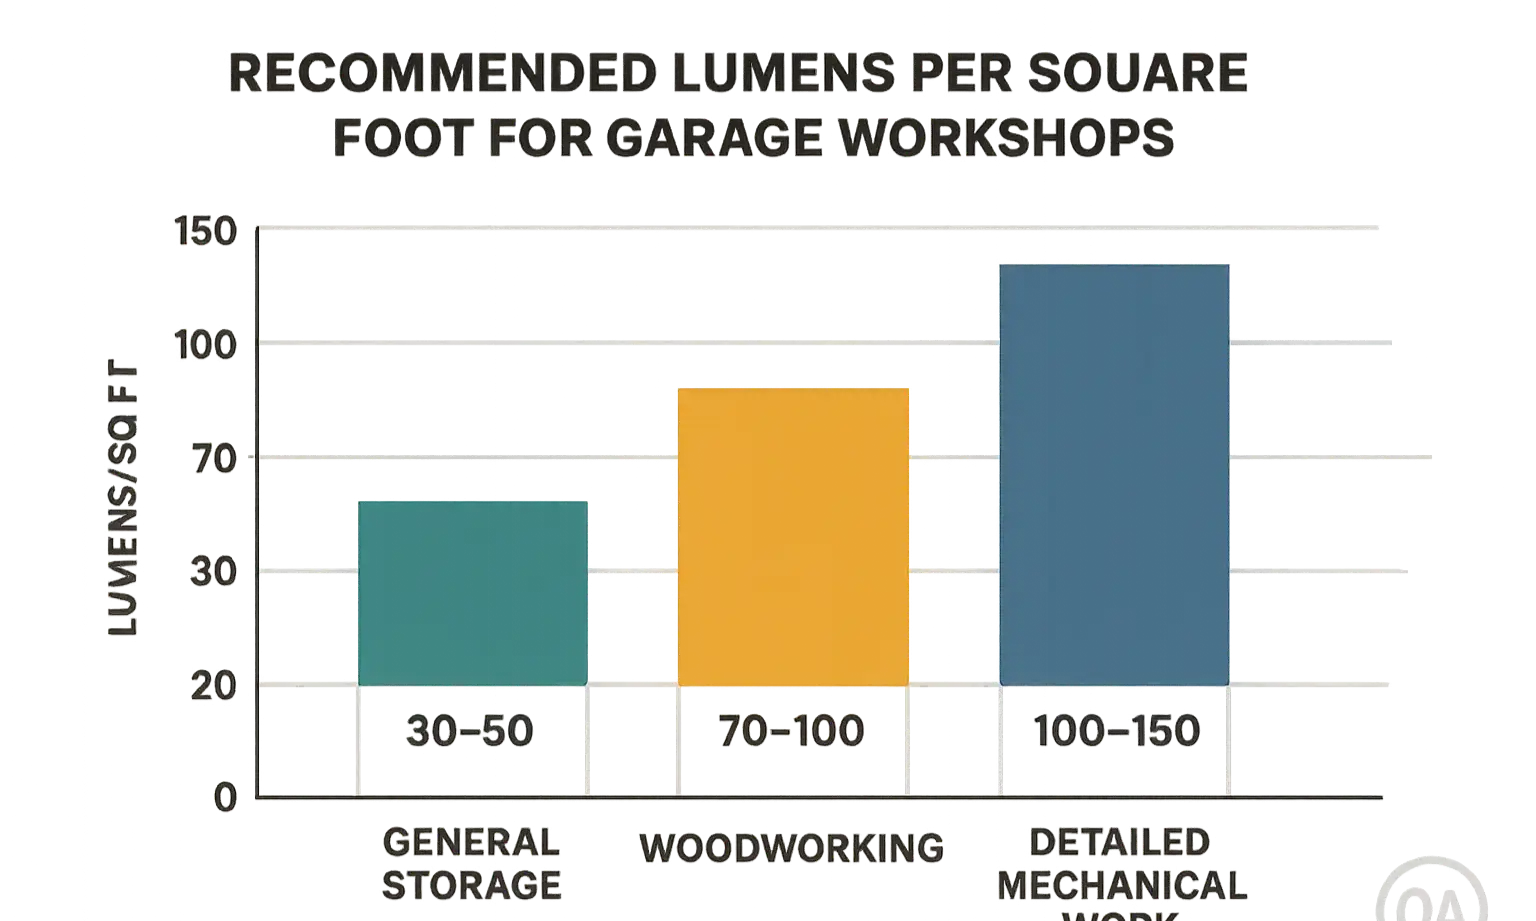
So, how many lumens do you need? It depends entirely on the work you do.
How to Use This Chart:
1. Calculate your garage’s square footage (Length x Width).
2. Multiply that number by the recommended lumens for your primary task.
This total lumen target is your starting point, which you’ll achieve with multiple fixtures, not just one.
2. Clarity (Color Temperature & CRI)
Not all light is created equal. The quality of your light directly impacts your ability to see detail, differentiate colors, and work for long periods without eye strain. Two key metrics define light quality:
Color Temperature (Kelvin): Measured in Kelvin (K), this describes how “warm” or “cool” the light appears.
Color Rendering Index (CRI): This is arguably the most overlooked and important metric for detail-oriented work. CRI is a scale from 0 to 100 that measures how accurately a light source reveals the true colors of an object compared to natural sunlight.
Have you ever tried to distinguish between a black wire and a dark brown one under a cheap light? That’s a low CRI problem. For tasks like painting, auto detailing, or electrical work, a low CRI light can lead to costly mistakes.
Key Takeaway: For any serious workshop, aim for LED lights with a color temperature of at least 5000K and a CRI of 85 or higher. A CRI of 90+ is considered excellent.
Have you ever tried to distinguish between a black wire and a dark brown one under a cheap light? That’s a low CRI problem. For tasks like painting, auto detailing, or electrical work, a low CRI light can lead to costly mistakes.
Key Takeaway: For any serious workshop, aim for LED lights with a color temperature of at least 5000K and a CRI of 85 or higher. A CRI of 90+ is considered excellent.
3. Coverage (The Real Key to Eliminating Shadows)
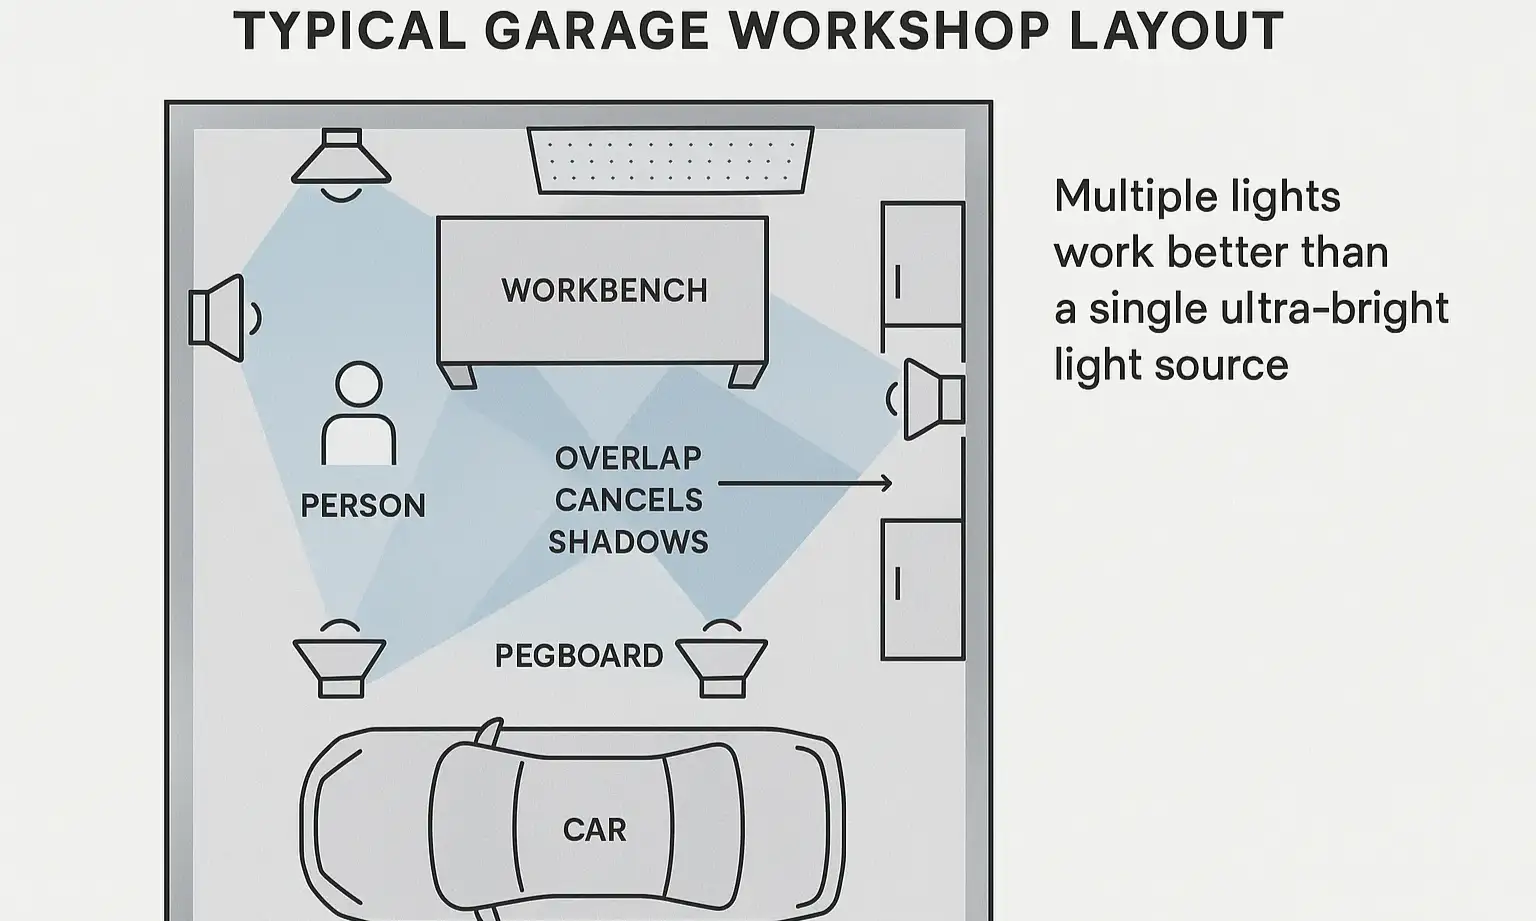
This is the pillar that solves the problem from our opening story. The single biggest mistake in garage lighting is relying on one central, high-powered light source. This creates a single point of light that is easily blocked by your body, tools, or equipment, casting hard, sharp shadows exactly where you don’t want them.
The solution is to create overlapping fields of light from multiple sources.
Building Your 3-Layer Lighting Plan
Professional lighting designers think in layers, and you should too. A layered approach ensures your entire space is usable, safe, and free of frustrating dark spots.
Layer 1: Ambient Lighting
This is your base layer of general, overhead illumination. Its job is to fill the entire space with even, diffused light, making it safe to navigate. This is typically achieved with evenly spaced LED shop lights, tube fixtures, or high-bay lights mounted on the ceiling. This is the foundation upon which you’ll build.
Layer 2: Task Lighting
This is the most critical layer for a workshop. Task lighting puts focused, intense light exactly where you need it most: over your workbench, drill press, miter saw, or any other primary work zone.
The magic happens when you place task lights on either side of your typical standing position, rather than directly overhead or behind you. This allows light to come from multiple angles, filling in the shadows your body would otherwise create. This strategy is especially important in garages with unique challenges, such as those that require a low headroom garage door system, where ceiling fixture placement can be limited.
Great task lighting options include:
Layer 3: Accent & Portable Lighting
This is your special forces layer. It includes any flexible or movable lights used for specific, hard-to-reach jobs. Think of a magnetic work light you can stick to the underside of a car hood, a gooseneck lamp for fine-detail electronics work, or a simple LED headlamp.
Mastery: Planning Your Perfect Layout
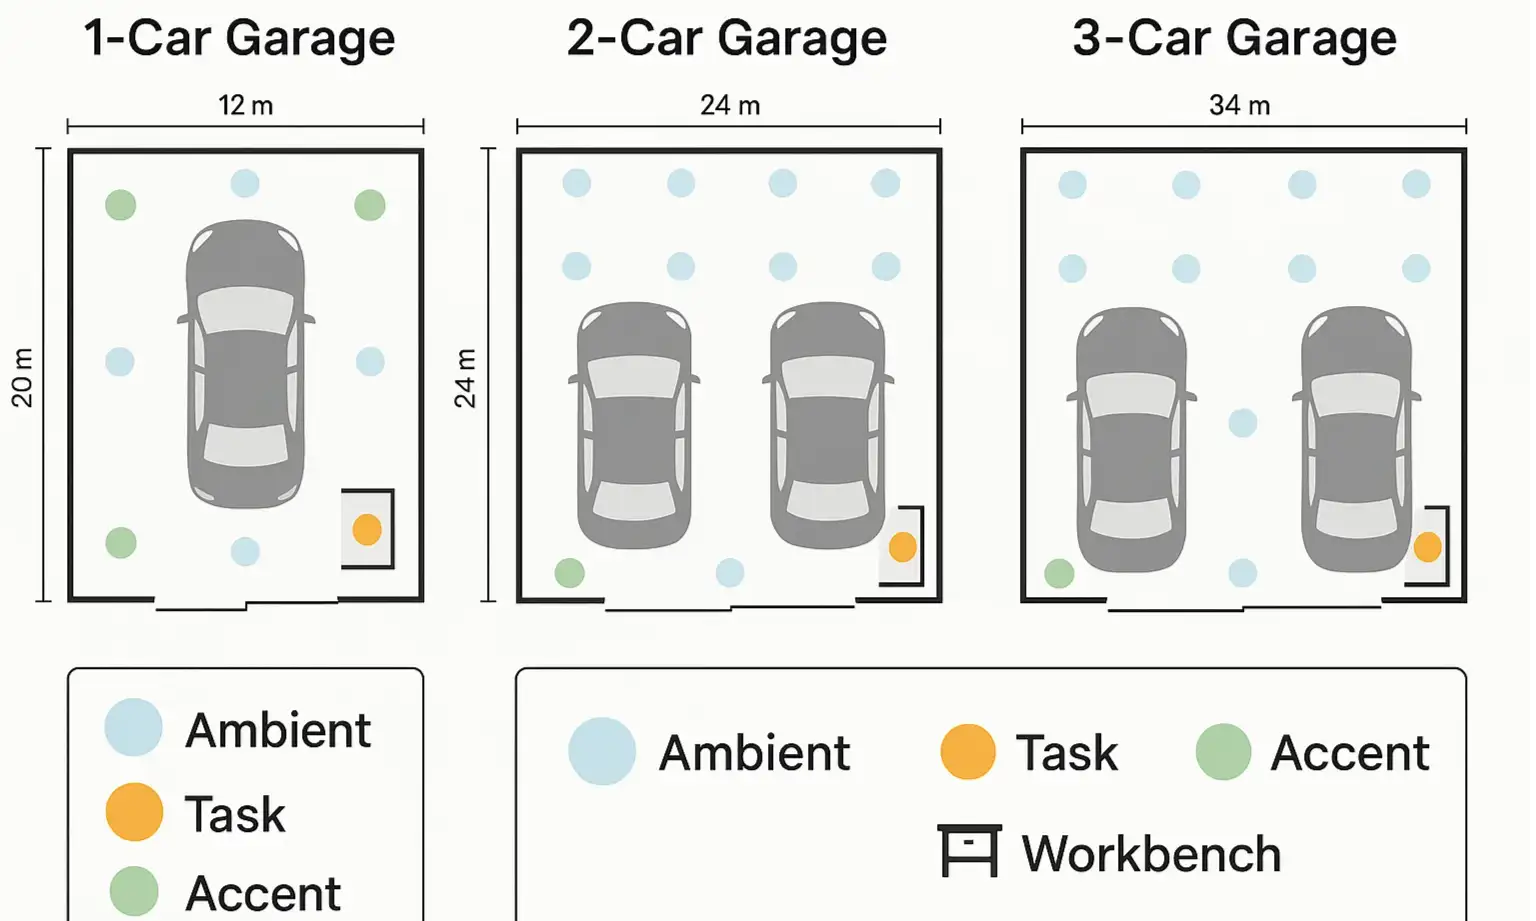
Now that you understand the principles, you can create a layout tailored to your space. Don’t just place lights randomly; plan their positions to maximize coverage and eliminate dark zones.
The ideal layout depends on your garage size and how you use the space—a one-car garage dedicated to auto work will have different needs than a three-car garage used for woodworking and general storage.
The ideal layout depends on your garage size and how you use the space—a one-car garage dedicated to auto work will have different needs than a three-car garage used for woodworking and general storage.
A Simple 3-Step Planning Process:
Frequently Asked Questions About Workshop Lighting
How many lumens do I need for my garage workshop?
It depends on your tasks. For general use and storage, aim for 50 lumens per square foot. For assembly and mechanical work, 70-100 lumens/sq ft is better. For highly detailed work like painting or intricate electronics, you might want 100-150 lumens/sq ft over your main workbench.
What’s the best color temperature (Kelvin) for a workshop?
For task-oriented spaces, 5000K to 6500K is ideal. This cool, daylight-balanced light reduces eye strain and helps you see details and colors more accurately.
Is one big light better than several smaller ones?
Absolutely not. This is the most common mistake. Multiple smaller lights are far superior because they create overlapping light fields that cancel out shadows, providing much clearer and more consistent illumination on your work surface.
Where should I place lights to avoid shadows?
For your main workbench, position task lights in front of you and to your sides, not directly overhead or behind you. This prevents your head and shoulders from blocking the light source. For general ambient lighting, an evenly spaced grid pattern is most effective.
Your Workshop, Illuminated
Moving beyond a single, blinding light to a thoughtful, layered lighting plan is the single greatest upgrade you can make to your garage workshop. It enhances safety, improves accuracy, and makes every project more enjoyable.
By focusing on the three pillars—sufficient Brightness (Lumens), excellent Clarity (CRI & Kelvin), and strategic Coverage (Layout)—you can finally conquer the shadows and build a workspace that’s as functional as it is inspiring. As you continue to upgrade your space, you might even consider integrating smart lighting with your overhead garage doors for automated, seamless illumination the moment you enter.
By focusing on the three pillars—sufficient Brightness (Lumens), excellent Clarity (CRI & Kelvin), and strategic Coverage (Layout)—you can finally conquer the shadows and build a workspace that’s as functional as it is inspiring. As you continue to upgrade your space, you might even consider integrating smart lighting with your overhead garage doors for automated, seamless illumination the moment you enter.
Frequently Asked Questions
How many lumens do I need for my garage workshop?
It depends on your tasks. For general use and storage, aim for 50 lumens per square foot. For assembly and mechanical work, 70-100 lumens/sq ft is better. For highly detailed work like painting or intricate electronics, you might want 100-150 lumens/sq ft over your main workbench.
What's the best color temperature (Kelvin) for a workshop?
For task-oriented spaces, 5000K to 6500K is ideal. This cool, daylight-balanced light reduces eye strain and helps you see details and colors more accurately.
Is one big light better than several smaller ones?
Absolutely not. This is the most common mistake. Multiple smaller lights are far superior because they create overlapping light fields that cancel out shadows, providing much clearer and more consistent illumination on your work surface.
Where should I place lights to avoid shadows?
For your main workbench, position task lights in front of you and to your sides, not directly overhead or behind you. This prevents your head and shoulders from blocking the light source. For general ambient lighting, an evenly spaced grid pattern is most effective.