Have you ever pressed the button for your garage door and watched it stop an inch from the ground, leaving an annoying gap? Or maybe it closes perfectly but the motor keeps humming for a few seconds, sounding like it doesn’t know when to quit. These common frustrations often point to one of the most important yet least understood parts of your opener: the limit switches.
Think of limit switches as the silent conductors of your garage door orchestra. Like setting an alarm clock, you tell them exactly when the motor needs to “wake up” (start moving) and “go to sleep” (stop). When these settings are off, the entire performance falls flat. Understanding how they work is the first step to solving some of the most common garage door problems and ensuring your door operates smoothly and safely.
Understanding the Role of Up and Down Limit Switches
Published: Apr 24, 2026 | Updated: Jul 28, 2026
Foundation: What is a Limit Switch and Why Does it Matter?
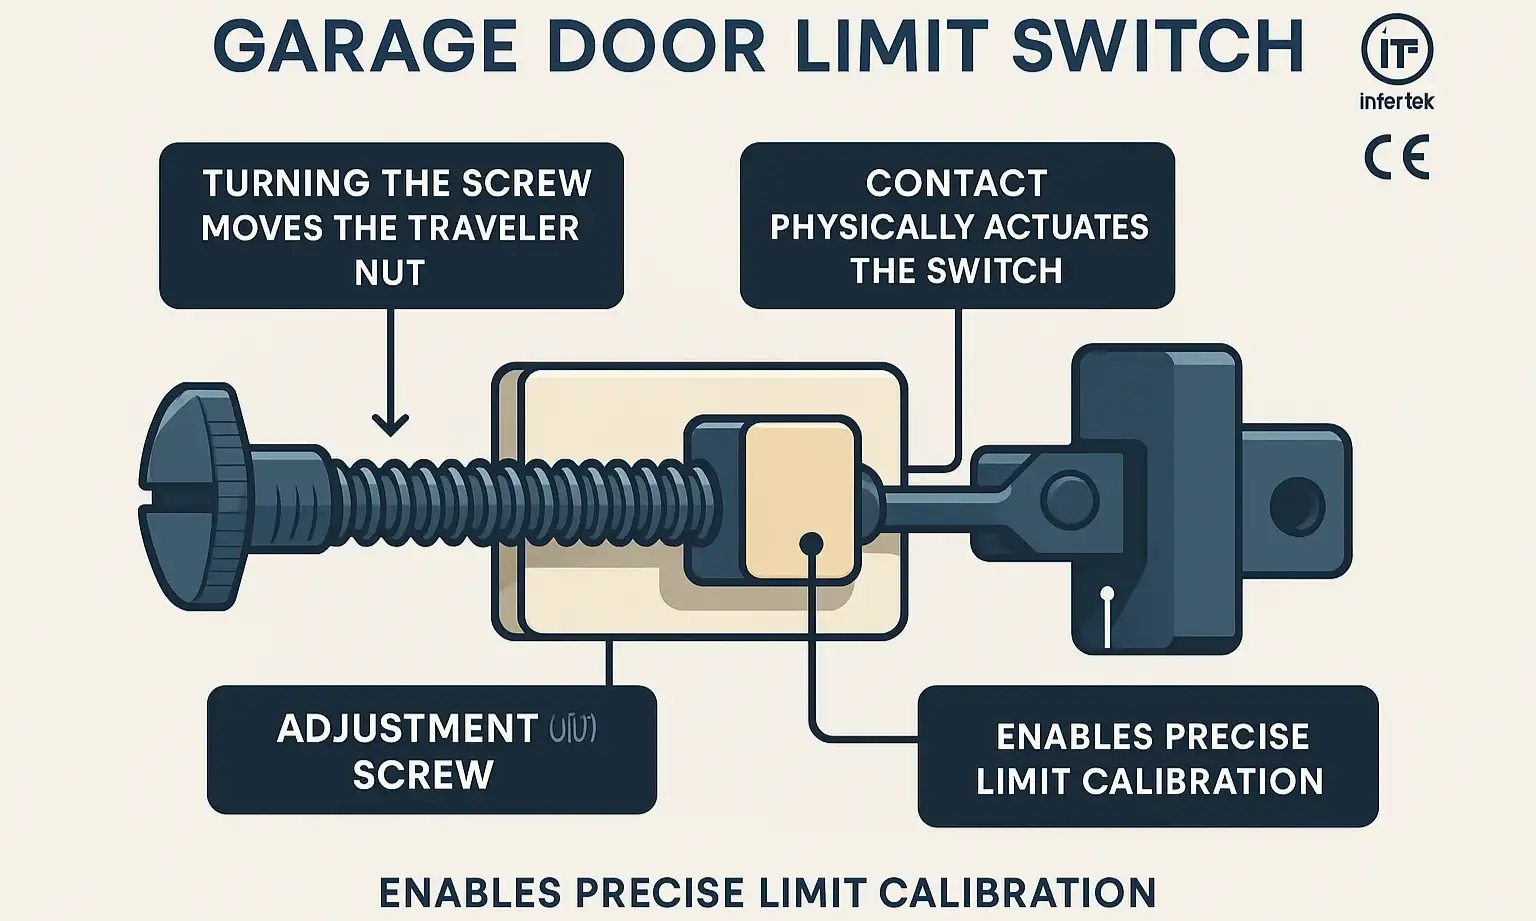
At its core, a garage door limit switch is a small electromechanical device that tells the motor when it has reached the fully open or fully closed position. Its entire job is to cut power to the motor at the precise moment the door completes its upward or downward travel. Without it, the motor would continue to run, potentially damaging the door, the opener, or both.
But how does it actually work? It’s a beautifully simple mechanism.
Inside most openers, there’s a long threaded rod connected to the main drive gear. As the door moves, this rod spins. On that rod is a small component, often called a “traveler nut,” that moves back and forth along the threads. On either side of this traveler are two small physical switches: the “up limit” and the “down limit.”
But how does it actually work? It’s a beautifully simple mechanism.
Inside most openers, there’s a long threaded rod connected to the main drive gear. As the door moves, this rod spins. On that rod is a small component, often called a “traveler nut,” that moves back and forth along the threads. On either side of this traveler are two small physical switches: the “up limit” and the “down limit.”
When you adjust the limit screws on the outside of your opener, you’re not directly changing the door’s position. Instead, you’re moving the physical location of the switches themselves.
This is the “aha moment” for most homeowners. The adjustment screws are simply a way to fine-tune the exact points where that traveler nut makes contact and tells the motor to stop. Understanding this mechanical cause-and-effect is the key to confident calibration.
This entire process is a critical part of how a garage door opener works, ensuring the system doesn’t over-exert itself.
This entire process is a critical part of how a garage door opener works, ensuring the system doesn’t over-exert itself.
Diagnosis: Is It Really a Limit Switch Problem?
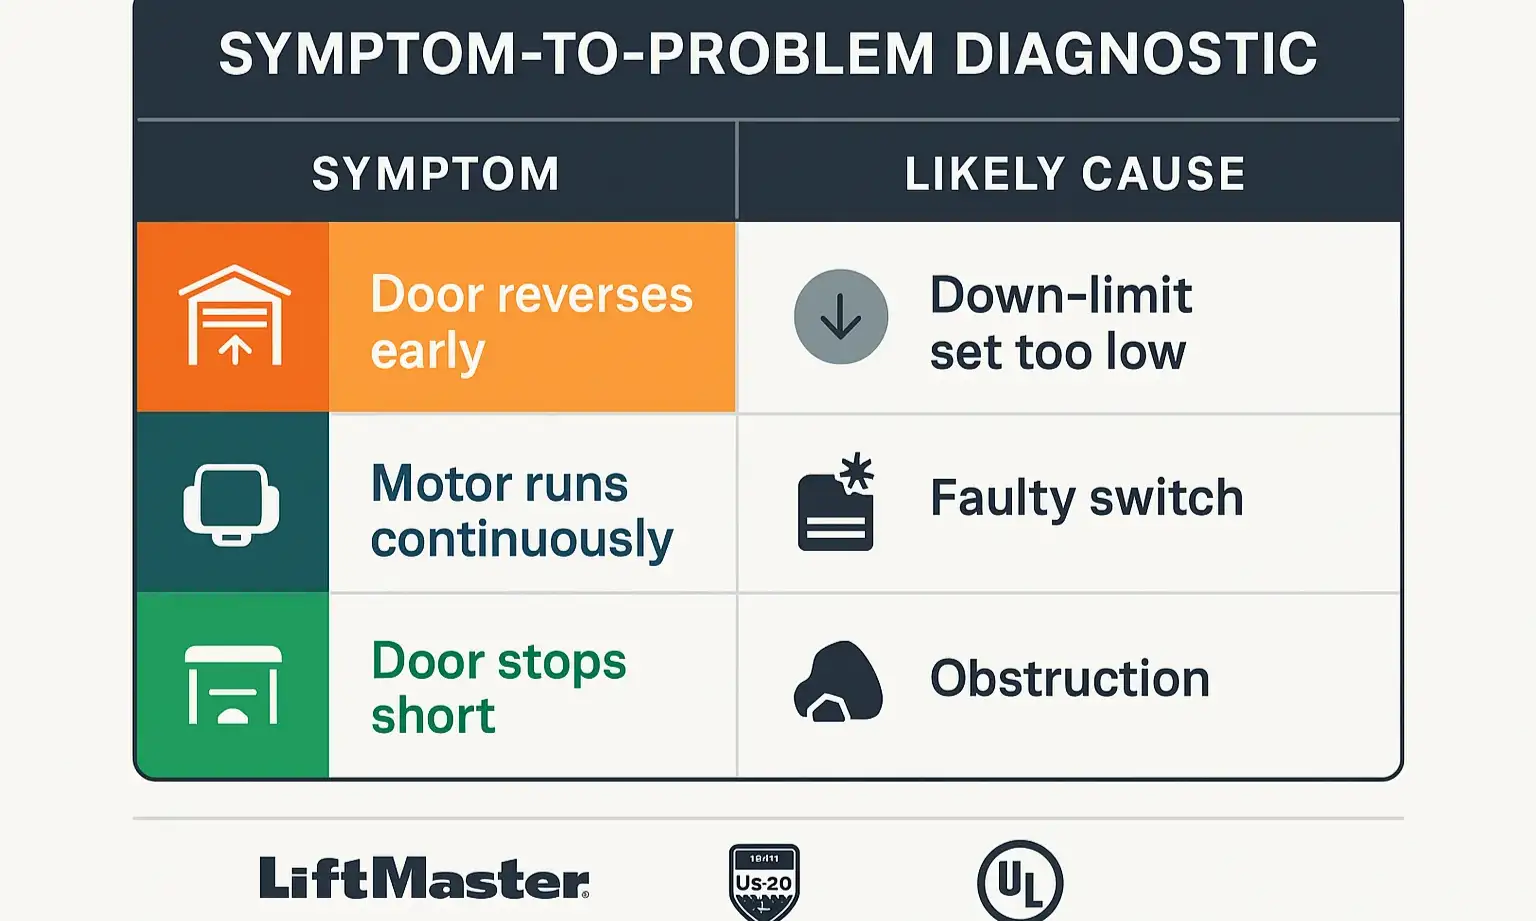
Before you start turning screws, it’s crucial to make sure you’re solving the right problem. Many garage door issues can mimic a limit switch malfunction. A classic example is a door that reverses before hitting the floor. While this could be a limit switch issue, it’s more commonly caused by obstructed garage door safety sensors.
So, how can you tell the difference? Use this diagnostic table to match your door’s behavior to the most likely cause.
By correctly identifying the symptom, you can avoid adjusting the wrong setting and potentially creating a new problem. For a more detailed overview, our quick troubleshooting guide can help you systematically rule out other issues.
So, how can you tell the difference? Use this diagnostic table to match your door’s behavior to the most likely cause.
By correctly identifying the symptom, you can avoid adjusting the wrong setting and potentially creating a new problem. For a more detailed overview, our quick troubleshooting guide can help you systematically rule out other issues.
Action: How to Adjust Your Limit Switches (The Master Guide)
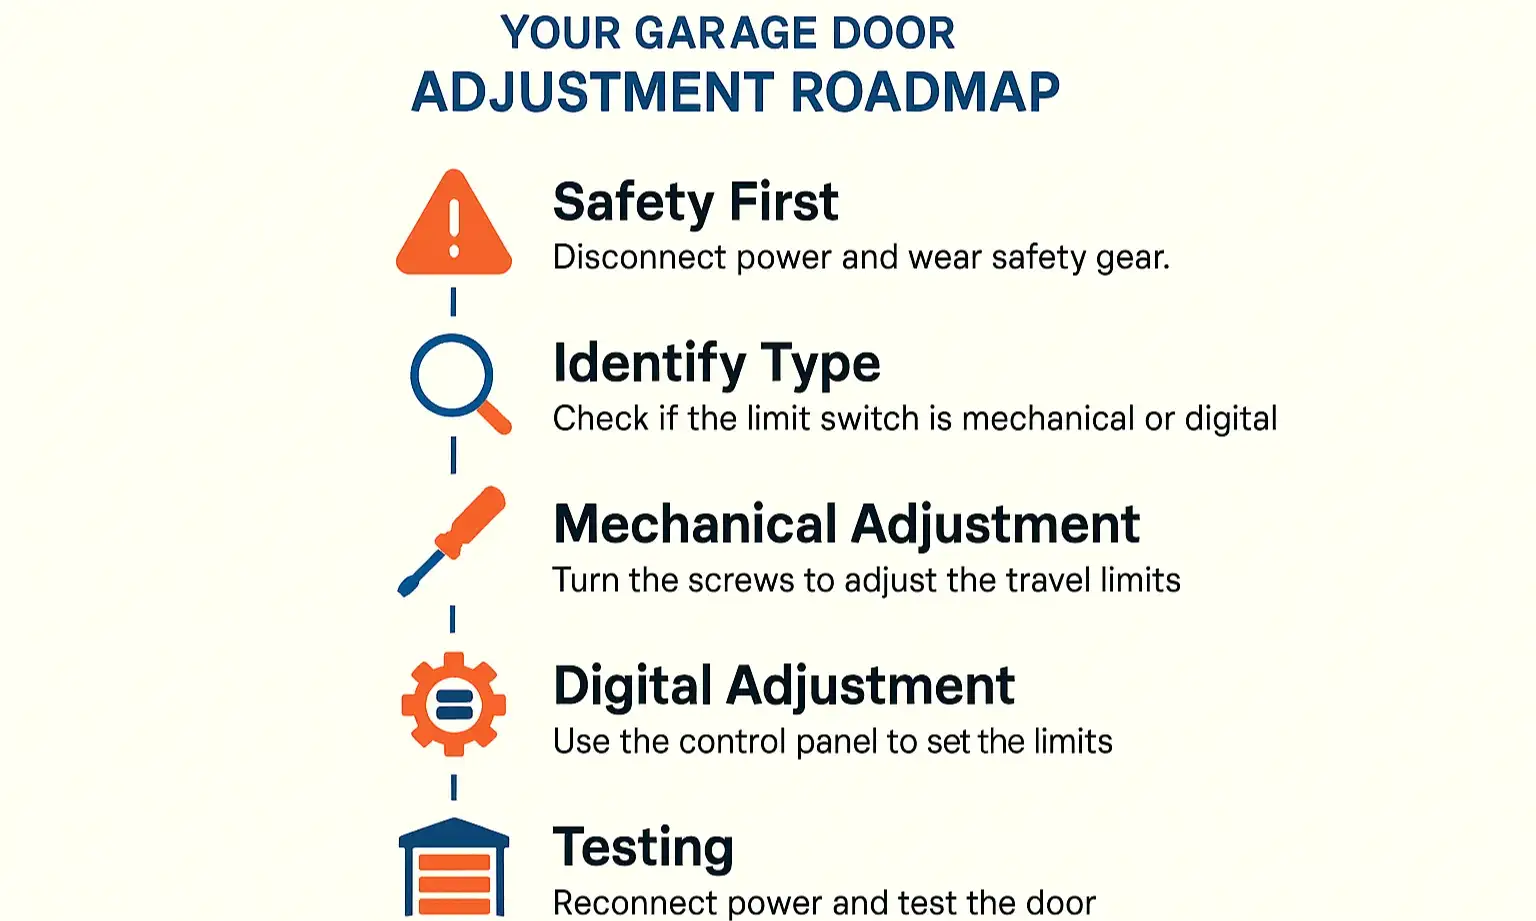
Once you’ve confirmed that a limit switch adjustment is needed, the process is generally straightforward. However, always prioritize safety.
1. Safety First: Before making any adjustments, disconnect the garage door from the opener by pulling the red emergency release cord. This allows you to move the door manually to find its ideal open and closed positions without power.
2. Identify Your Type: Look at your opener unit. Most models use one of two systems:
2. Identify Your Type: Look at your opener unit. Most models use one of two systems:
3. Make Small Adjustments: Whether using screws or buttons, the key is to make small, incremental changes. For screw-based systems, a single full turn typically equates to about two inches of door travel.
Mastery: Advanced Troubleshooting
Sometimes, a simple adjustment isn’t enough. Here are a few advanced concepts to help you master your opener’s calibration.
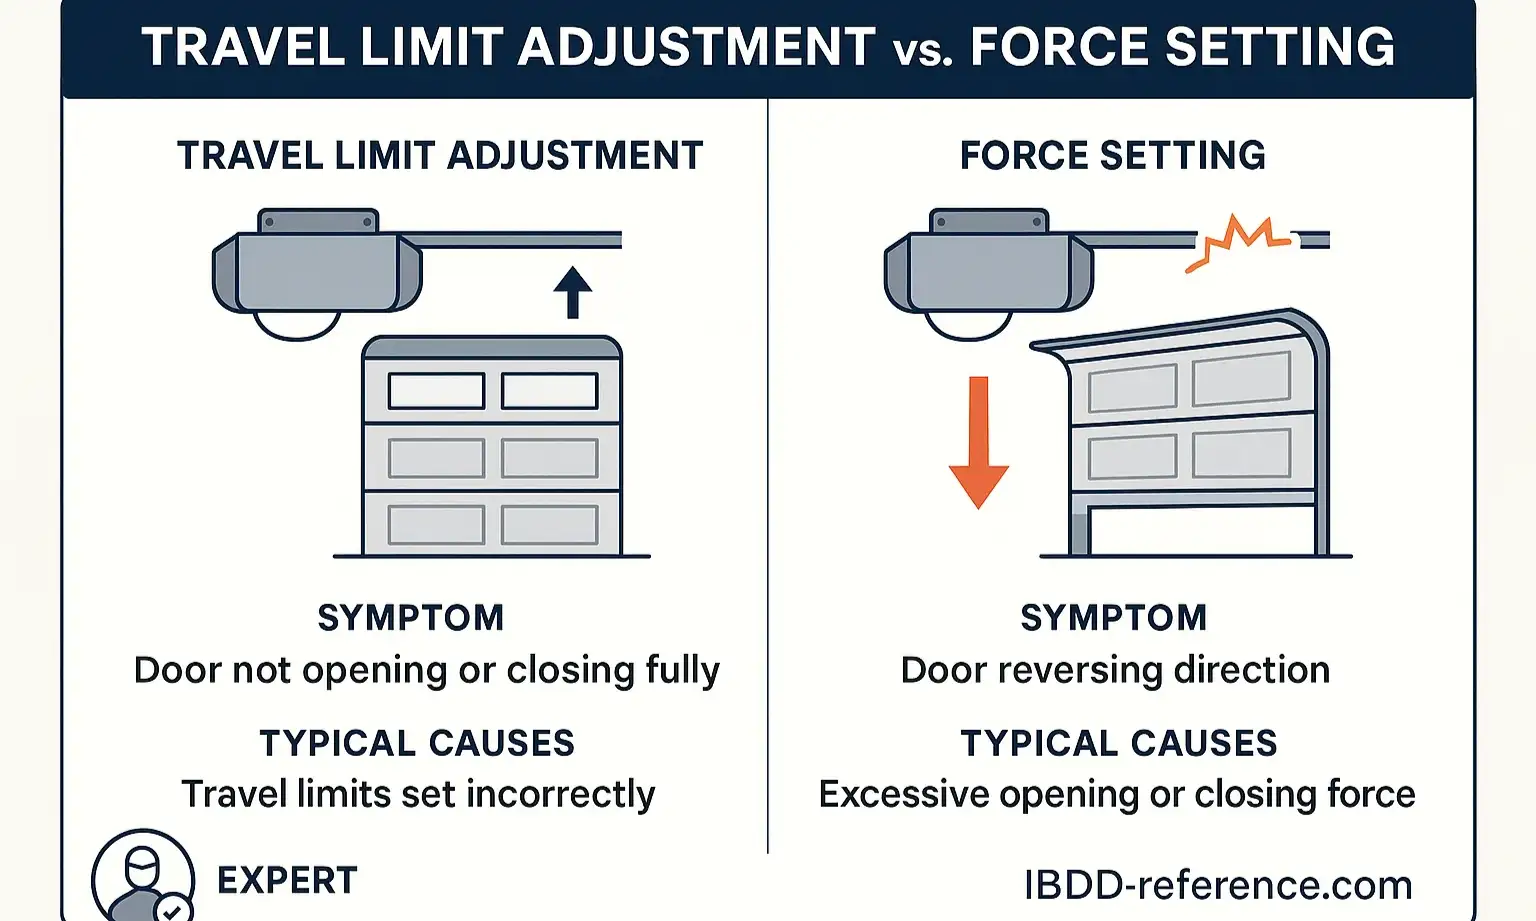
Common Mistake: Confusing Travel Limit with Force Settings
This is the number one error homeowners make. On your opener, you will see two types of adjustments: Travel Limit and Force. They solve very different problems.
Key takeaway: If your door is stopping in the wrong place, adjust the Travel Limit. If it’s reversing mid-travel for no apparent reason, check the Force setting.
Frequently Asked Questions
Why did my limit settings suddenly change?
This is common with weather shifts. Wood doors can swell with humidity, and extreme cold can make the entire system contract and require more force. These physical changes can alter the door’s final stopping point, requiring a minor limit adjustment. It doesn’t necessarily mean anything is broken.
What happens if the adjustment screws don’t do anything?
If turning the screws has no effect, the limit switch assembly itself might have failed. The plastic gears can strip, or the switch itself can break. This is a clear sign that a professional repair is needed, as it often involves replacing internal garage door parts.
Is this related to the tension in the big springs?
No, but they are connected. The limit switches control the opener, while the springs do the actual lifting. A properly balanced door (thanks to correct spring tension) puts less strain on the opener, allowing the limit and force settings to work reliably. This is different from having to adjust garage door spring tension, a task that should always be left to professionals due to the extreme danger involved.
My opener is beeping. Is that a limit switch problem?
Usually not. A beeping sound often indicates an issue with the battery backup or other internal diagnostics. If you hear a persistent beeping, it could signal other issues, which we cover in our guide to why your garage door opener is beeping.
Your Path to a Perfectly Tuned Door
Understanding your garage door’s limit switches demystifies the opener and empowers you to perform one of the most common and effective DIY fixes. By learning the “why” behind the mechanism, you can diagnose issues accurately, make adjustments confidently, and know exactly when a problem is simple enough to solve yourself—or complex enough to call for expert help.
Frequently Asked Questions
Why did my limit settings suddenly change?
This is common with weather shifts. Wood doors can swell with humidity, and extreme cold can make the entire system contract and require more force. These physical changes can alter the door's final stopping point, requiring a minor limit adjustment. It doesn't necessarily mean anything is broken.
What happens if the adjustment screws don't do anything?
If turning the screws has no effect, the limit switch assembly itself might have failed. The plastic gears can strip, or the switch itself can break. This is a clear sign that a professional repair is needed, as it often involves replacing internal garage door parts.
Is this related to the tension in the big springs?
No, but they are connected. The limit switches control the opener, while the springs do the actual lifting. A properly balanced door (thanks to correct spring tension) puts less strain on the opener, allowing the limit and force settings to work reliably. This is different from having to adjust garage door spring tension, a task that should always be left to professionals due to the extreme danger involved.
My opener is beeping. Is that a limit switch problem?
Usually not. A beeping sound often indicates an issue with the battery backup or other internal diagnostics. If you hear a persistent beeping, it could signal other issues, which we cover in our guide to why your garage door opener is beeping.